It was a morning just like any other when I stepped into a client’s home and was met with an unsettling sight—lush hardwood floors that had serious unevenness, warping, and unsightly gaps. That moment hit me like a punch in the gut. I realized then how critical proper floor leveling truly is. Poorly leveled floors aren’t just an aesthetic issue; they can cause long-term damage, squeaks, and even compromise the durability of your entire flooring project. I’ve been there, making my fair share of mistakes early on, like rushing through the prep phase and ignoring crucial surface assessments, which only made problems worse down the line. This is why I want to share some foolproof tips to help you avoid those pitfalls and ensure your floors are perfectly level from the start.
Why Proper Floor Leveling Sets the Stage for Success
Getting the foundation right is everything. A well-leveled floor not only guarantees a seamless look but also extends the lifespan of your investment. Think about it—if your subfloor isn’t flat, the entire surface above it will reflect those imperfections. This can lead to uneven wear, tile cracking, or a warped hardwood finish that you’ll regret every time you walk across it. According to experts, even minor surface irregularities can significantly affect flooring integrity, leading to costly repairs later. As someone who’s learned this the hard way, I can’t emphasize enough how much time and money you save by investing in quality leveling techniques upfront. And the best part? When your foundation is solid, other steps like trim installation and aesthetic finishing go smoothly, saving you headaches down the road.
Looking Skeptical? Think it’s Too Difficult?
Honestly, I used to think floor leveling was a complex, tedious task. My early attempts were riddled with mistakes—like overusing repair compounds or overlooking moisture issues—that left me frustrated and with subpar results. It wasn’t until I delved into proven techniques and reliable tools that I started seeing real improvements. If you’re feeling unsure about whether floor leveling is worth the effort or if you can do it yourself, remember that with the right guidance, you can master it. For comprehensive strategies, I recommend checking out these expert-level leveling techniques. Don’t let fear hold you back—mastering this step can truly elevate your flooring project from good to extraordinary.
In the upcoming sections, I’ll walk you through practical, straightforward steps to achieve perfectly level floors—no matter the size or scope of your project. Ready to transform your space? Let’s get started on laying that flawless foundation.
.
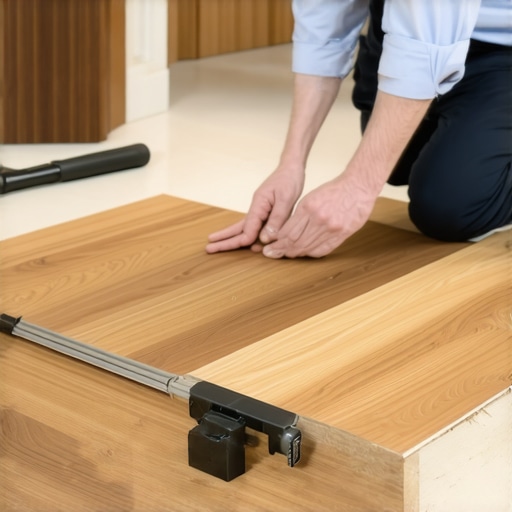
Preparing the Surface for Success
Start by thoroughly inspecting your subfloor. Use a long straightedge or a level to identify high spots, low areas, and any dips. Imagine your subfloor as a landscape: valleys are low spots, peaks are high points. Mark these irregularities clearly. During a project I worked on last summer, I found a hidden dip behind a closet wall—failing to catch this would have caused uneven flooring. Address high spots by grinding them down with a hand grinder equipped with a diamond blade, ensuring they don’t interfere with the flatness. For low spots, apply a suitable floor leveling compound, blending it into the surrounding surface. Always follow the manufacturer’s instructions closely to prevent issues like cracking or bubbling. This meticulous approach creates a stable foundation, preventing future problems such as squeaks or uneven wear.
Applying Floor Leveling Compounds Effectively
Mix your self-leveling compound to a pourable consistency—think thick pancake batter. Pour it into the low areas starting from the highest point, allowing gravity to help spread the material evenly. Use a trowel or a smoothing tool to gently work the compound into corners and edges. Remember, over-application can lead to an uneven surface, so less is more. During a recent job, I poured compound in a confined laundry room, then used a gauge rake to spread it uniformly, avoiding excessive build-up that would make tile installation difficult. Wait for the compound to cure fully—this may take several hours or overnight—before proceeding. Proper curing prevents surface bubbles or cracks, which can compromise the entire flooring setup. Once hardened, sand down any high spots to achieve a perfectly flat surface.
Ensuring Moisture Balance Before Installation
Moisture issues can sabotage your project. Use a moisture meter to check the subfloor’s level; excessive moisture can cause leveling compounds and adhesives to fail. Think of moisture as a hidden villain—it undermines everything grown on top of your subfloor. In my experience, skipping this step led to flooring warping after a few months. If moisture levels are high, install a vapor barrier or opt for moisture-resistant primers. This extra step acts like a shield, ensuring your level surface stays intact over time. When installing hardwood floors, confirm the wood’s moisture content matches the subfloor; differences can cause gaps or buckling down the line. A small investment in moisture testing saves a lot of headache and costly repairs later.
Double-Check the Flatness
After applying leveling compounds, re-inspect the surface with your long straightedge or level. Place it at various angles and over different areas. If any gaps greater than 1/8 inch are visible, additional leveling or grinding is necessary. Remember, the goal is a seamless surface where a 12-inch ruler rests flat across the entire area. I once failed to double-check after leveling, only to realize an unsightly bump after laying tile. That mistake cost me extra time and materials for corrections. Take the time to verify multiple times—it’s the difference between a professional-looking result and a frustrating redo. For best results, consider renting a laser level or using a calibrated straightedge for precise measurements, which I covered in my comprehensive guide to techniques for flawless surfaces.
Final Surface Preparation Touches
Before installing your chosen flooring, clean the entire surface thoroughly. Remove all dust, debris, and residual compounds. Use a damp cloth or vacuum with a brush attachment—imagine giving your floor a final grooming. This ensures adhesives bond properly and prevents bubbles or lifting. For tile installations, a clean and even surface is crucial; any dirt or uneven patches can lead to cracked tiles or loose grout. Always follow best practices outlined in tile installation pointers to maximize longevity. Remember, the foundation of a beautiful floor lies in meticulous surface prep, which you can master with patience and attention to detail.Many homeowners and even some professionals often operate under misconceptions when it comes to hardwood flooring and floor leveling. Let’s dig deeper into some of these myths that can lead to costly mistakes if left unchallenged. One pervasive belief is that a perfectly flat subfloor isn’t essential for hardwood installation. In reality, even minor surface irregularities can cause squeaks, gaps, and uneven wear over time. According to flooring experts, a subfloor with deviations greater than 1/8 inch over six feet can significantly compromise durability, highlighting the importance of precise surface preparation. Another common myth is that self-leveling compounds can instantly fix all subfloor issues. While these products are effective for minor dips, relying solely on them for major unevenness can mask underlying problems and lead to long-term instability. Proper assessment and targeted repairs are crucial for a lasting finish.
Many believe that hardwood floors are forgiving in terms of moisture; however, excess moisture—whether from humidity spikes or leaks—can cause wood to warp, cup, or buckle. An often-overlooked nuance is that even small moisture variations between the subfloor and the wood planks can have a profound impact. It’s essential to use moisture meters to ensure levels are within acceptable ranges before installation. Ignoring this step often results in expensive repairs down the line.
For tile and other flooring types, some assume that the same leveling principles apply universally. But tile requires a particularly flat surface, and deviations beyond 1/16 inch across a 24-inch span can cause tiles to crack or loosen prematurely. Advanced installers use laser-guided leveling tools to achieve extreme precision, which is a nuance many overlook. In fact, the difference between an amateur and a professional is often found in the attention paid to these finer details.
Are you aware of how critical these subtleties are? These misconceptions can trap even seasoned DIYers or contractors, leading to issues that might not surface immediately but degrade your flooring’s lifespan. For more insights on achieving flawless surfaces, I recommend reviewing this comprehensive guide. Don’t let false assumptions undermine your project—check your facts, assess your surface carefully, and always aim for precision. Have you ever fallen into this trap? Let me know in the comments.Maintaining impeccable hardwood, tile, or any flooring requires more than just initial installation skills; it’s about using the right tools and adopting proper maintenance habits. A key aspect I swear by is investing in a high-quality moisture meter like the Protimeter Surveymaster. This device provides precise readings crucial for preventing warping or buckling over time, especially in areas prone to humidity fluctuations. I rely on such tools not only during installation but also for ongoing inspections—ensuring your subfloor remains within optimal moisture levels, which is critical for environmental stability and longevity. Additionally, I recommend incorporating a laser level, like the Bosch GLL 3-80, for periodic checks on floor flatness. Precision tools like these make routine maintenance easier, catching issues early before they escalate into costly repairs. Prediction-wise, as smart technology advances, we’re moving towards integrating IoT sensors directly into floors for real-time monitoring—an exciting trend to watch.
How do I keep my floors in top shape over the years?
Proper cleaning with pH-neutral cleaners is fundamental; avoid harsh chemicals that can dull finishes. Regularly inspect for signs of moisture intrusion or surface imperfections, and address them promptly. When spills happen, tackle them quickly with a damp cloth—delaying can lead to staining or warping. Sealing hardwoods every few years with a quality finish helps protect against wear and tear. For tile and hard surfaces, sealing grout lines prevents moisture penetration, which is key for durability. Using felt pads on furniture prevents scratches, while avoiding excessive water exposure extends the life of your flooring. Adopting a proactive maintenance routine using these precise tools and habits ensures your floors stay stunning and durable for decades. To learn about advanced surface protection, consider exploring detailed strategies in the expert guide to floor protection. Start with testing your moisture levels regularly—this simple step can save thousands in repairs down the line and ensure your investment remains pristine.
Uncovering Hidden Pitfalls That Cost Me Time and Money
One of the most profound lessons I learned was not to underestimate the importance of precise surface inspection. Rushing through surface assessment led to unforeseen bumps that caused me to redo entire sections, increasing costs and frustration. Now, I double-check everything, understanding that a small irregularity can snowball into major problems later. Perfection begins at the foundation, and overlooking minor imperfections often results in significant setbacks.
The Power of Proper Tool Selection for Long-Term Results
Investing in quality tools like laser levels and moisture meters dramatically improved my workflow and outcomes. Cheap tools may save money initially but often lack the precision needed for flawless results. I’ve found that reliable equipment, although an upfront investment, pays off by reducing errors and rework—saving both time and money in the long run. Trusting the right tools is a game-changer in achieving professional-grade floors.
Balancing Confidence with Humility in Your Craft
Early in my career, I believed I could handle everything solo. Experience taught me the value of seeking advice and collaborating, especially for complex leveling tasks. Staying teachable keeps your work top-notch and avoids costly mistakes. Sharing knowledge with peers or consulting experts can uncover nuances you might not recognize alone. Remember, humility is a strength, not a sign of weakness, in mastering flooring installation.
Resources That Elevated My Skills and Confidence
Among the most valuable resources I’ve used are expert-level leveling techniques and detailed guides like the comprehensive floor leveling manual. These references provided step-by-step instructions and insights that bridged my knowledge gap. Additionally, I rely on trusted tools and professional forums to stay updated on best practices. Continual learning transforms challenges into opportunities for mastery.
Step Into Your Flooring Journey with Confidence
Embarking on a flooring project might seem daunting, but with the right knowledge, tools, and mindset, you’re capable of delivering stellar results. Every misstep became a lesson, propelling me toward better craftsmanship and greater satisfaction. Believe in your ability to create beautiful, durable floors that stand the test of time. Start small, learn from each step, and don’t hesitate to seek expert advice when needed. Your future floors are waiting to tell your story—make sure it’s a story of excellence.
What’s been your biggest challenge in floor leveling or installation? Share your experiences below—I’d love to hear how you’re overcoming obstacles on your journey!