I remember the first time I installed hardwood floors in my living room. I was so eager to see that beautiful finish, but within months, the floors started creaking and uneven patches appeared. It was a frustrating wake-up call. That lightbulb moment taught me a hard lesson: no matter how stunning the wood looks, if the subfloor isn’t properly leveled, your investment can quickly turn into a headache.
Why Proper Floor Leveling Is the Secret to Floors That Last
If you’ve ever faced cracks, gaps, or squeaks in your hardwood, you know how disheartening it can be. These issues aren’t just cosmetic—they’re often signs of underlying problems with uneven subfloors or improper installation. The good news? With the right techniques and tips, you can ensure your floors stay beautiful and durable for years to come. In 2025, mastering floor leveling isn’t just a trend; it’s a necessity to achieve that flawless finish everyone desires. According to experts, floors that aren’t properly leveled can reduce the lifespan of your flooring by up to 30%. That’s a huge difference in durability and savings over time.
Is Floor Leveling Actually Worth the Hype?
Early in my flooring journey, I made the mistake of skipping the detailed leveling process, thinking it was an unnecessary step. I believed that a quick fix would suffice. But that cost me dearly—gaps appeared, and I had to redo sections, wasting time and money. Trust me, proper floor leveling is the backbone of a lasting installation. If you want to avoid my mistakes, I highly recommend checking out expert strategies for durable results that will set you on the right path and save headaches down the line.
So, if you’ve faced issues like uneven surfaces or are just eager to get it right the first time, stick around. We’ll explore proven tips and techniques to level your floors perfectly—because a great floor starts with a solid foundation. Ready to dive into the secrets of lasting hardwood flooring and flawless leveling? Let’s go!
Start with a Solid Foundation
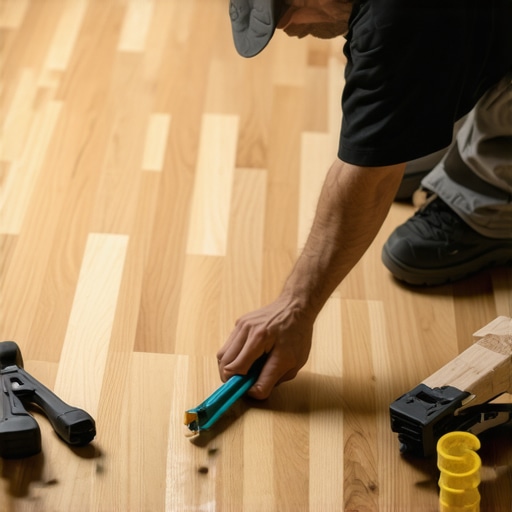
My first experience with floor leveling was messy but insightful. I used a self-leveling compound to fill dips in the subfloor, pouring it slowly and using a long level to guide my work. The key here is patience and precision; rushing can lead to uneven surfaces. For best results, follow the instructions on your leveling product carefully and consider consulting resources like precise leveling techniques to avoid common mistakes. This step ensures your subfloor is as flat as possible, minimizing future issues. Make sure to remove any debris or dust before applying the leveling compound to ensure proper adhesion.
Use the Right Tools and Materials
Equip yourself with a high-quality trowel, a long straightedge, and a reliable level. I found that a laser level helped me identify high and low spots quickly, saving time and effort. When selecting materials, opt for a self-leveling compound designed for your specific subfloor type. Applying the correct product in the right thickness is crucial; consult expert strategies to choose wisely. Remember, using subpar materials can compromise your entire flooring project, leading to cracks and uneven wear over time.
Prepare the Subfloor Thoroughly
This step is often overlooked but vital. I once skipped cleaning the subfloor, which caused the leveling compound to bubble and crack. To avoid that, sweep and vacuum the surface meticulously, removing all dust, grease, and loose particles. If necessary, lightly sand rough areas to ensure a smooth base. For detailed guidance, check out expert installation tips. Proper preparation guarantees that your leveling compound bonds well and remains durable over the years.
Apply the Leveling Compound Correctly
Mix the compound as per the manufacturer’s instructions. I recommend doing a small test patch first to get a feel for the consistency. When pouring, start from the high point and let the compound flow naturally into low spots. Use a trowel or gauge rake to spread it evenly and eliminate air bubbles. Work in manageable sections to prevent it from setting before you finish. For advanced techniques, see ultimate leveling guides. The goal is to create a perfectly flat surface that will support your hardwood flooring without issues down the line.
Finish with a Smooth Sanding and Inspection
Once the compound has cured, lightly sand the surface with fine-grit sandpaper to remove any imperfections. I used a hand sander for small areas, but a pole sander will save time on larger spaces. After sanding, inspect the surface for any dips or bumps—use your level and straightedge to verify flatness. If necessary, apply a second layer of leveling compound for perfection. This meticulous approach pays off by preventing squeaks, gaps, or cracking in your finished floor. For more detailed finishing steps, visit flooring installation tips. The effort you put into this phase directly influences the longevity and beauty of your hardwood floors.
Many DIY enthusiasts and even seasoned homeowners fall prey to misconceptions about floor leveling, which can lead to costly mistakes and subpar results. Let’s dig deeper into what most people get wrong and how to avoid these pitfalls. One prevalent myth is that a quick, superficial fix like simply adding a thin layer of leveling compound will solve all unevenness issues. In reality, this approach often masks underlying problems such as structural shifts or subfloor damage that require a more comprehensive assessment. Overlooking these factors can cause the floor to settle unevenly over time, compromising durability and aesthetics. For a more reliable solution, I recommend consulting detailed strategies like precise floor leveling techniques that account for the entire subfloor system.
Another common mistake is underestimating the importance of proper surface preparation. Many DIYers skip thorough cleaning, which can lead to poor adhesion of the leveling compound, resulting in bubbles, cracks, or uneven surfaces. Proper preparation involves sweeping, vacuuming, and sometimes sanding to ensure a clean, flat base. This step might seem tedious, but it’s vital for long-lasting results. For detailed guidance, check out expert installation tips.
Advanced installers often debate the necessity of multiple leveling layers. Some argue that a single, thick pour is sufficient, but this can lead to cracks and shrinkage issues if the compound isn’t applied correctly or if the subfloor has significant dips. Building up in multiple thin layers with proper curing in between offers a more stable and durable foundation. This nuanced approach can drastically improve the longevity of your hardwood floors, especially in areas prone to movement or settling. For expert insights, see expert strategies for durable results.
Lastly, many underestimate the importance of leveling in relation to the type of flooring material. Hardwood and tile have different tolerances for uneven surfaces. Hardwood flooring, in particular, requires a perfectly flat subfloor to prevent squeaks, gaps, and uneven wear. In contrast, some tile installations can accommodate minor irregularities with proper grout and adhesive. Knowing these nuances can save you from unnecessary rework and ensure your flooring performs optimally. To learn more about selecting the right levelness for your specific flooring, visit choosing the right hardwood floors.
Have you ever fallen into this trap? Let me know in the comments and share your experience so others can learn from it!
Keeping your hardwood floors in top shape over the years requires more than just initial installation skills. It involves using the right tools, adopting effective maintenance routines, and understanding how to troubleshoot issues as they arise. In this article, I’ll share my experience with the essential equipment I rely on and how to perform regular upkeep to ensure your floors remain stunning and durable for decades. Plus, I’ll suggest where trends are heading in the realm of flooring maintenance, so you can stay ahead of the curve.
How do I maintain hardwood floors over time?
Consistent maintenance begins with the right cleaning tools. I personally swear by a microfiber dust mop—it’s gentle yet effective at removing surface dust and debris without scratching the finish. For deeper cleaning, I recommend using a pH-neutral wood floor cleaner, which preserves the finish and prevents buildup. I’ve tested several brands, but my go-to is Bona Hardwood Floor Cleaner, as it’s specifically formulated for wood surfaces and doesn’t leave streaks.
To tackle stubborn spots or sticky residues, a soft-bristled brush paired with a damp cloth is invaluable. Avoid excessive water or harsh chemicals, which can damage the wood over time. Regularly inspecting your floors for signs of wear or damage allows you to catch issues early. For example, if you notice scratches or dull patches, using a quality wood floor polish or refinishing kit can restore the shine and protect the surface.
Tools I recommend for ongoing maintenance
One tool I’ve found indispensable is a floor buffer with a soft pad attachment. It’s perfect for rejuvenating the surface without the need for full sanding, especially when coupled with a good-quality polish. I also keep a small detail sander in my toolkit for spot repairs—if a scratch or gouge appears, a quick sanding followed by touch-up stain can save you from costly refinishing projects.
In addition, a reliable vacuum with a soft brush attachment helps keep the floor free of debris, which can cause scratches if left unattended. I also use a humidity monitor to ensure the environment stays within the recommended range (around 35-55%), as fluctuations in humidity can cause the wood to expand or contract, leading to gaps or buckling.
Future trends in floor maintenance
Looking ahead, I predict the integration of smart sensors in flooring systems that can alert homeowners to issues like moisture intrusion or humidity changes in real-time. Additionally, advances in eco-friendly, self-cleaning coatings could reduce the need for manual cleaning and polishing, making maintenance more effortless than ever. Staying updated with these innovations will help you keep your floors looking pristine with less effort.
Ready to take your hardwood maintenance to the next level? Try investing in a good-quality buffer and polishing system—these tools can extend the life of your floors significantly. For tailored advice or repairs, don’t hesitate to contact experts through this contact page. Remember, consistent upkeep is key to preserving the beauty and durability of your investment for years to come.

Lessons Learned from the Hardest Floors
- Patience is Key: Rushing through floor leveling can lead to cracks and squeaks. I learned that taking my time, especially with multiple thin layers, pays off in the long run.
- Never Skip Surface Prep: Cleaning the subfloor thoroughly before applying leveling compounds prevented bubbles and future unevenness. Skipping this step cost me dearly later.
- Tools Make the Difference: Investing in quality tools like a laser level and a reliable sander transformed my results from mediocre to professional-looking.
- Understand the Subfloor: Not all subfloors are created equal. Knowing whether I was dealing with plywood, concrete, or particleboard helped me choose the right leveling approach.
- Multiple Layers for Stability: Building up in layers rather than a single thick pour created a more durable, crack-resistant surface. This tip saved me from future repairs.
My Go-To Resources for Floor Leveling
- Expert Techniques: I rely on precise floor leveling strategies for guidance on achieving flawless results every time.
- Installation Tips: For overall flooring installation, expert tips are invaluable.
- Tools and Materials: I trust quality products from reputable brands, which I found through reviews on dedicated DIY forums and care guides.
- Learning from Pros: Watching tutorial videos on floor leveling has helped me avoid common pitfalls.
Your Next Step to Flawless Floors
Don’t let uneven subfloors hold back your flooring dreams. With the right knowledge, tools, and patience, you can achieve a durable, beautiful hardwood floor that lasts for decades. Remember, every expert was once a beginner who decided to give it a try—so why not you? Start with a solid foundation, keep learning, and enjoy the process of transforming your space. What’s the biggest challenge you’ve faced with floor leveling? Share your story below and let’s learn together!