
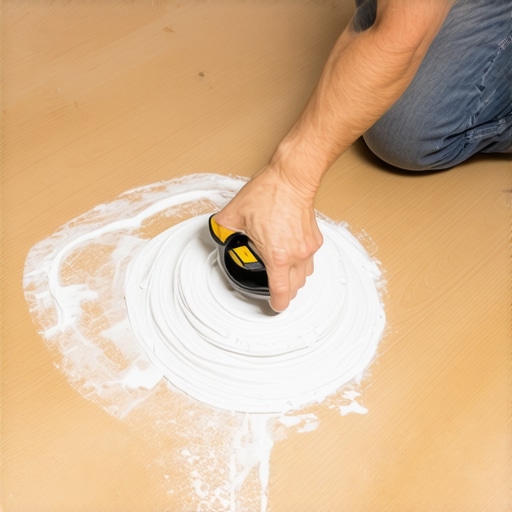
Have you ever laid down new hardwood or tile and noticed a squeak or felt uneven spots under your feet? I vividly remember the moment I stepped onto my freshly installed floor and felt that subtle hump right in the middle of the room. At first, I thought it was just my imagination—or maybe a minor imperfection. But as I moved around, that unevenness nagged at me, making me question whether I’d done everything right. Turns out, I was missing a simple yet powerful technique that could have saved me hours of frustration: the shaving cream trick for detecting high spots on your subfloor.
Spotting Uneven Foundations Before It’s Too Late
Sometimes, the smallest high spot on your subfloor can lead to big problems down the line—squeaky floors, cracked tiles, or uneven surfaces that ruin the entire look of your finished space. The challenge is that high spots are often invisible to the naked eye, especially in large or poorly lit rooms. That’s why I want to share a method I wish I had known earlier: using shaving cream as a visual indicator to find those troublesome high spots before laying down your final flooring materials. Trust me, detecting and correcting these issues early can mean the difference between a flawless finish and a costly redo.
Is the Shaving Cream Trick Actually Worth the Hype?
When I first heard of the shaving cream technique, I was skeptical. It sounded a bit too simple, maybe even gimmicky. But early in my DIY journey, I made a mistake by rushing through the leveling process without checking for high spots thoroughly. That oversight led to a noticeable unevenness that I had to fix later—far more labor-intensive and expensive. According to flooring experts, addressing high spots at the beginning can dramatically improve the longevity and appearance of your floors (source). This experience taught me that a small investment of time in precise detection can save you a mountain of trouble in the future.
Now, let’s talk about how exactly this trick works and how you can incorporate it into your renovation toolkit. Whether you’re installing hardwood, tile, or vinyl, knowing where your subfloor is uneven makes all the difference. Ready to learn the step-by-step process that transformed my approach—and can do the same for you? Keep reading, because what’s coming next will arm you with practical, real-world skills to ensure your flooring project turns out beautifully, without surprises or setbacks.
Applying the Shaving Cream Technique for Precise Detection
Start by cleaning the entire subfloor surface thoroughly to remove dust and debris. Wear gloves to prevent slipping and keep your hands clean during the process. Lightly spray a generous amount of shaving cream over the entire area; think of it as spreading a soft, even blanket that reveals every bump beneath. Use a straightedge or a long level, pressing it gently onto the surface, to identify where the shaving cream sinks or gathers unevenly. This visual cue indicates high spots that need attention. During my project, I applied this method in my living room, and the shaving cream revealed a stubborn high region near the doorway that I hadn’t noticed before—saving me from future tile lippage.
Assessing and Marking High Spots
As you analyze the shaving cream distribution, pay close attention to areas where the cream curls or peeks out from under the straightedge. These spots are significantly higher than their surroundings. Mark these locations carefully with a pencil or chalk, creating a clear map of where to focus your leveling efforts. In my case, I marked around a cabinet corner where the shaving cream was most pronounced, which allowed me to target my grinding tool precisely. Remember, the goal is to achieve a perfectly flat surface, akin to a calm lake surface—nothing should be jutting out or dipping in.
Addressing High Spots Effectively
Once identified, use a belt sander, grinder, or hand planer to carefully remove excess material from the high areas. Think of this step as trimming a tree branch—you want a gentle, controlled cut to prevent removing too much. Regularly re-spray the shaving cream after each pass to see your progress clearly. This iterative process ensures you’re honing in on a level surface without overcorrecting. I learned this the hard way when I initially removed too much from one high spot, creating an unintended dip—re-application and patience reframed my approach. After the correction, reapply shaving cream to test the surface, aiming for an even distribution across the entire area.
Verifying the Flatness Continually
After leveling, recheck the entire surface with the straightedge and shaving cream. A consistent, even coat indicates you’ve achieved a smooth, flat base. This visual confirmation is vital before proceeding to flooring installation. Don’t skip this step; it’s similar to laying a solid foundation for a house—every imperfection now will magnify later. In my experience, taking this time saved weeks of fixing uneven flooring or dealing with squeaks and cracked tiles afterward. For assurance, you can also set a long level or laser level across the surface, comparing readings at multiple points to ensure uniformity. This step is akin to tuning a musical instrument—precision here guarantees harmony in your finished floor.
Maintaining Consistency and Preventing Future Issues
Finally, document your high spots and leveling work for future reference, especially if the project spans multiple days. Seal or protect the leveled subfloor to prevent debris from settling before installation begins. Remember, the more accurate your initial leveling, the easier the rest of your flooring process—think of it as laying a perfect canvas for your masterpiece. By applying the shaving cream method systematically, I avoided common pitfalls like uneven tile lippage or squeaks. For more advanced techniques and troubleshooting tips, explore [the ultimate guide to floor leveling](https://tiletrendshop.com/the-ultimate-guide-to-floor-leveling-for-a-perfect-finish), which complements this hands-on approach.Many homeowners and even some professionals fall prey to certain misconceptions that can compromise the quality of tile and flooring projects. One pervasive myth is that perfect leveling is solely about using the right tools, like laser levels or straightedges, but in reality, understanding the subtle nuances—such as substrate preparation and the type of leveling compounds—is equally crucial. For example, assuming that all concrete slabs behave identically ignores the variations in moisture content and curing times, which can lead to future buckling or cracking if not properly assessed (source).
Another widespread mistake involves the assumption that a uniform layer of thinset guarantees a level tile surface. In practice, unlevel substrates often hide beneath this thin veneer, and without proper substrate assessment—including checking for high spots or soft spots—tile installation can suffer from lippage and unevenness. Moreover, many overlook the importance of using the correct trowel notch size; using a too-small notch might seem efficient but leads to voids under tiles, causing weak adhesion and potential cracks over time (link).
The hidden nuance that trips up even experienced installers is related to the micro-variations in substrate porosity, which affect how adhesives and sealants cure. For instance, applying a standard primer without considering the specific porosity of the surface can result in poor bonding or bubbling later. A top-tier expert tip is to perform a damp sponge test to evaluate surface porosity before applying any adhesive or finish, ensuring optimal bonding conditions (source).
Finally, many underestimate the importance of timing and environmental conditions during installation. Working in high humidity or extreme temperatures can negatively influence drying times and adhesion strength, leading to long-term problems. This is why verifying conditions beforehand, rather than assuming standard conditions, is vital for longevity. Advanced installers routinely review these subtle factors, ensuring their work withstands the test of time.
Have you ever fallen into this trap? Let me know in the comments, and remember—true mastery in flooring requires more than just the basic steps; it’s about mastering these hidden nuances that make all the difference.
Investing in Precision Tools for Flawless Floor Maintenance
Maintaining the beauty and functionality of your flooring isn’t a one-and-done task; it requires the right tools combined with consistent care. One of my go-to equipment pieces is a high-quality long-reach level, which helps me detect subtle dips or elevations in the subfloor over time—crucial for spot-checking areas after heavy furniture shifts or seasonal changes. Additionally, I rely on a detailed moisture meter, not just for initial installation but for periodic assessments—especially important in climates with fluctuating humidity (source). For hardwood floors, I recommend a soft cloth buffer with specialized cleaning pads and a gentle wood floor cleaner to preserve the finish without introducing scratches or damage.
Software and Record-keeping to Track Long-Term Results
Beyond physical tools, I utilize a simple digital log to monitor maintenance routines, product shelf life, and seasonal inspections. Smartphone apps dedicated to home maintenance help schedule periodic checks, ensuring no aspect of your flooring is neglected. For example, tracking refinishing intervals for hardwood floors can extend their lifespan—proper sanding and sealing can keep them looking new for decades. Many professionals also maintain detailed records of previous repairs and refinishing dates, which helps identify recurring issues or wear patterns—saving time and money in the long run. Remember, consistent monitoring coupled with occasional professional assessments can significantly improve your floors’ durability (source).
Scaling Up Your Floor Care Routine for Larger Spaces
If you’re managing a sizable area or commercial property, automation becomes vital. I recommend investing in commercial-grade vacuum systems with HEPA filters to reduce dust and debris effectively. For larger projects, power floor scrubbers with adjustable brushes can keep expansive hardwood or tile surfaces free of dirt and grime, preventing long-term wear. Additionally, integrating laser-guided leveling systems during early maintenance fixes ensures the subfloor remains as flat as possible, minimizing future unevenness or cracking. As I anticipate flooring trends evolving toward smart technology, future tools may include IoT-connected sensors that alert you when subfloor moisture levels rise beyond acceptable thresholds, allowing preemptive action prior to visible damage (source). For now, combining manual inspections with modern equipment offers the best balance of precision and reliability.
How do I keep my floors looking great over time?
Implement routine cleaning with gentle, pH-balanced solutions, and always protect high-traffic areas with rugs or pads. Reapply protective finishes on hardwood periodically to shield against scratches and fading, which can be seen in our detailed hardwood maintenance guide. For tile, sealing grout lines at least annually prevents staining and degradation. Remember, the secret to long-lasting floors isn’t just regular cleaning but proactive, targeted maintenance—using the right tools and methods at the right time. I encourage you to try implementing a moisture meter assessment post-season shift; it’s an advanced step that can catch potential problems early and save you from costly repairs down the line.
Lessons that Changed My Approach to Flooring
One of my biggest revelations was realizing that even seasoned professionals can overlook subtle imperfections that compromise a project’s quality. Discovering the shaving cream trick taught me to trust simple, visual methods over complex measurements—saving time and ensuring precision. I also learned never to underestimate the importance of continual checks; even tiny high spots can escalate into major problems if ignored. Lastly, embracing patience and multiple re-evaluations transformed my work from hurried to meticulous, delivering flawless results that stand the test of time.
The Tools and Resources That Elevate My Flooring Game
For precision detection, I swear by a high-quality straightedge paired with a reliable level—these are my go-to for quick spot checks. When it comes to assessing moisture or porosity, my digital moisture meter and damp sponge tests have prevented countless issues. I also turn to trusted guides like the fundamental leveling techniques that anchor my process. Additionally, I follow industry blogs and forums where experts share tips on substrates, curing times, and leveling compounds—keeping me updated on best practices.
Embrace Your Flooring Journey: Your Floor Deserves It
Remember, every careful step you take toward understanding and applying hidden lessons and trusted tools enhances your craftsmanship. Whether you’re tackling a small remodel or a large-scale upgrade, this commitment can turn a daunting project into a rewarding experience. I encourage you to try the shaving cream test on your next project or invest in a quality moisture meter—these small shifts can lead to a noticeable difference. Your floors will thank you, and so will your future self looking at a job well done.
What’s one subtle mistake you’ve learned to avoid in your flooring projects? Share your insights below—I’d love to hear your stories!