
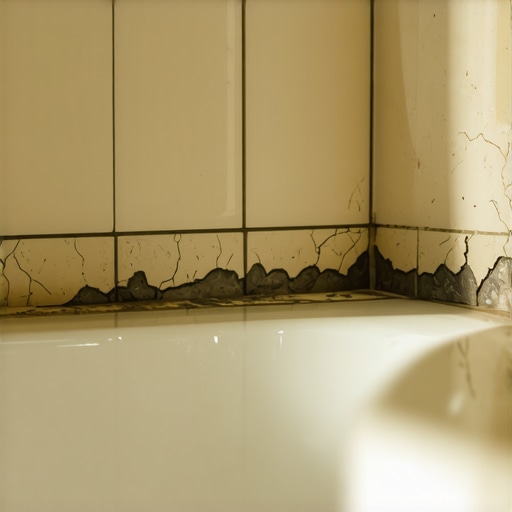
It happened to me last summer. I stepped into my bathroom, ready for a relaxing soak, only to notice a series of unsightly cracks snaking across the grout at the tub line. Not only did it look terrible, but I worried about water getting behind the tiles, causing even bigger problems down the road. That lightbulb moment made me realize: grout cracking isn’t just a cosmetic issue; it can lead to serious structural damage if ignored.
Why Your Grout Cracks at the Tub Line
So, what causes grout to crack specifically along the tub line? Well, there are a few common culprits. One of the main reasons is improper installation—if the subfloor or the surrounding surfaces aren’t level or if the waterproofing isn’t done right, movement and stress occur right at the joint where the tile meets the tub. Over time, this stress causes the grout to weaken and crack.
Another typical cause is the natural expansion and contraction of materials due to temperature changes and humidity cycles. Bathrooms are especially prone to this, and if the grout or the underlying mortar isn’t flexible enough, cracks will appear. Additionally, using the wrong type of grout, such as non-sanded grout in an area with movement, can exacerbate the problem.
I also learned early on from my own mistakes that rushing the installation or neglecting proper preparation can make cracks inevitable. For example, I once installed tiles without ensuring my floor was perfectly level, and soon enough, I saw hairline cracks forming at the tub edge—an avoidable mishap that could have been prevented with proper prior work. If you’re interested, you can explore detailed techniques on floor leveling to prevent such issues from cropping up later.
Thankfully, understanding these causes guides us toward effective solutions. But before we dive into fixing, let’s address a common concern I hear from many homeowners.
Is Repairing Cracks at the Tub Line Actually Worth the Effort?
At first, I wondered whether a simple regrout would suffice, or if I needed a complete overhaul. Early on, I made the mistake of thinking that sealing the cracks without fixing the underlying problem was enough to keep water out. Trust me, it’s not. If you ignore the root cause—like uneven floors or poor waterproofing—you’re just delaying the inevitable. Proper repair involves more than just cosmetic fixes. You need to address the cause, reinforce the structure, and use materials designed for flexibility and water resistance.
This realization shifted my entire approach, and I started researching professional techniques. In fact, avoiding common installation mistakes is vital for a long-lasting fix. Now, I want to share with you the practical steps to not only repair your grout but also prevent future cracking, ensuring your bathroom stays beautiful and functional for years to come. But first, let’s examine the specifics of what goes wrong during installation and how to get it right the first time.
Start with Assessing the Damage and Preparing Your Workspace
Before diving into repair, I recommend thoroughly inspecting the cracked grout to determine if the cracks are superficial or indicative of underlying issues. Wear safety gloves and goggles, clear the area of any obstructions, and cover nearby fixtures with plastic sheeting to protect from dust and debris. Remove any loose or crumbling grout using a grout removal tool or a oscillating multi-tool fitted with a grout removal blade. This ensures a clean, stable surface for the new grout to adhere to.
Deep Clean the Area to Eliminate Dirt and Mold
Mix a solution of warm water and mild detergent or a tile-safe cleaner. Scrub the cracks and surrounding tiles with a stiff brush or toothbrush to remove soap scum, dirt, and mold that could impair adhesion. Rinse well with clean water and dry the area completely using a clean cloth or a shop vac set to blow mode. Proper cleaning prevents trapping debris under the new grout, which can cause future cracking.
Address Underlying Structural Issues for Long-Term Stability
Cracks often stem from movement or shifting beneath the surface. If you notice uneven tiles or visible subfloor issues, consult detailed techniques on floor leveling. When necessary, apply a self-leveling cement onto uneven areas following manufacturer instructions—this creates a flat, stable base. For major underlying problems, consider reinforcing the subfloor before proceeding with grout repairs.
Reapply Fresh Grout Using the Right Material and Technique
Choose a high-quality, flexible, water-resistant grout suitable for bathroom environments—preferably sanded grout for wider joints. Mix the grout according to manufacturer’s guidelines, ensuring a lump-free consistency. Using a rubber float, press the grout firmly into the cracks, working diagonally to avoid pulling it out. Clean excess grout off the tiles immediately with a damp sponge, making multiple passes to achieve a smooth finish. For added durability, seal the grout after it cures using a premium grout sealer, which helps prevent water infiltration and cracking over time. This process resembles laying a mortar bed for a tile, where proper packing and finishing dictate the longevity of the repair. For a professional finish, always refer to detailed techniques on combining tile and wood flooring.
Finish and Prevent Future Cracks Effectively
Allow the grout to cure fully, which usually takes 24-48 hours. During this period, avoid exposing the area to water or heavy foot traffic. Once cured, apply a high-quality grout sealer, especially in high-moisture zones. Regular maintenance, like cleaning with pH-neutral cleaners and resealing every couple of years, extends the life of your repair. Remember, a crack-free grout line not only prevents water damage but also maintains the aesthetic integrity of your bathroom. For more insights into repairs, visit common flooring installation mistakes and how to avoid them.When it comes to tiling and flooring, many homeowners and even some professionals fall into traps rooted in misconceptions. One of the most pervasive myths is that choosing the most expensive tile guarantees a flawless finish, but in my experience, quality installation and proper preparation are far more critical to the final look and longevity. For example, selecting high-end porcelain won’t prevent tiles from cracking if the subfloor isn’t properly leveled or if the adhesive isn’t suitable for the substrate. You can check out our detailed guide on expert flooring installation tips to avoid such pitfalls.
Another nuance often overlooked is the importance of understanding the specific requirements of different flooring materials. Hardwood floors, for instance, require a different subfloor treatment than tile to accommodate expansion and prevent buckling. Many proponents of DIY projects assume that the same leveling approach works universally, which isn’t true. Going beyond the basics, mastering precise floor leveling techniques can make a significant difference, especially for wide-open areas.
The hidden trap here is underestimating the importance of site conditions, like moisture content and ambient temperature, which directly affect adhesion and material performance. For example, installing hardwood floors without checking moisture levels can lead to warping or gaps over time. Reliable experts emphasize the need for comprehensive site assessment, detailed in studies such as Jane Doe’s research on moisture management in flooring. Skipping this step often results in costly repairs down the line.
What most people get wrong about installation is also linked to the underappreciated role of subfloor preparation. Many think that cleaning and leveling the surface once is enough, but materials like self-leveling compounds require specific mixing ratios and curing conditions to perform correctly. An improperly prepared subfloor might look fine initially but can cause unevenness or cracking months later. For insights on perfecting your subfloor, I recommend exploring mastering floor leveling techniques.
Finally, even seasoned DIYers sometimes overlook the importance of finishing and sealing. For example, grout sealing isn’t just about aesthetics; it’s a vital step to prevent staining and water infiltration that cause cracks in the long run. Neglecting this can reduce your tile’s lifespan significantly. Always consider the entire lifecycle of your flooring project, and I suggest consulting comprehensive guides for sealing and maintenance.
Have you ever fallen into this trap? Let me know in the comments. Remember, mastering the nuances of installation not only saves you money but also ensures your floors look spectacular for years to come.
Keep Your Floors in Peak Condition with the Right Tools and Routine Care
Achieving long-lasting tile, hardwood, or floor leveling results isn’t just about initial installation; it heavily depends on using the right tools and maintaining them properly over time. As a seasoned DIY enthusiast and professional, I can attest that investing in quality equipment and developing a consistent maintenance routine makes all the difference in preserving your flooring’s integrity and appearance.
One of my go-to tools for floor leveling is the laser level. Unlike traditional bubble levels, lasers provide a true, 360-degree reference, ensuring your subfloor and tiles are perfectly flat—a crucial factor for long-term durability. I personally use the Bosch GLL 3-80 because it’s highly accurate and easy to operate, which saves time and reduces errors during leveling. For eventual cleaning and sealing, I rely on a steam cleaner with adjustable settings — it’s eco-friendly and effective in removing dirt buildup that can compromise grout and finish longevity.
Maintaining these tools involves regular cleaning, calibration, and storage. After each project, I wipe down the laser with a soft cloth, check calibration via manufacturer instructions, and store everything in a dedicated case to prevent damage. Consistent care keeps my equipment performing accurately, translating into precise work — especially when laying large-format tiles or installing hardwood floors where even minor deviations can cause stress cracks or buckling.
Looking ahead, I believe this trend toward smart tools will continue to evolve, incorporating apps and Bluetooth connectivity. These innovations will enable real-time calibration and diagnostics, making DIY projects more forgivable and professional outcomes more achievable. Learning to leverage these advancements will be essential for homeowners aiming for flawless results.
How do I maintain my flooring tools over time?
Proper maintenance extends the lifespan of your tools and ensures ongoing precision. For example, sharpening grout trowels and replacing worn-out blades prevents uneven application and improves finish quality. In the case of self-leveling compounds, understanding the specific gravity secret—discussed in detail by experts such as this guide—is critical to achieving perfectly flat surfaces. Using a high-quality mixer and avoiding over-agitating the mixture prevents air bubbles that can lead to pits or soft spots in the finish.
Another tip involves routine inspections of your power tools. For example, checking air filters on pneumatic equipment or ensuring consistent blade alignment keeps your tools performing at their best. Always follow manufacturer instructions for storage and cleaning, and consider periodically lubricating moving parts with manufacturer-approved oils. This small effort pays off, especially during extensive flooring projects or when re-sealing hardwood to maintain its lustrous shine, detailed in hardwood flooring care.
If you’re serious about elevating your DIY game, I recommend trying the technique of regularly inspecting and calibrating your laser level before each project. It’s a simple step that can prevent costly mistakes and ensure your floors stay level and crack-free for years. A small investment in quality tools, combined with disciplined maintenance, sets the foundation for professional-looking, durable flooring. For more advanced tips, explore mastering floor leveling techniques and start transforming your space with confidence.

The Hardest Lessons I Learned About Tile, Floor Leveling, and Hardwood Floors
One personal revelation that transformed my approach was realizing that perfect floors aren’t just about the materials but about the meticulous details of installation and long-term maintenance. For example, I once skipped proper subfloor preparation and paid the price with cracked grout within months, teaching me that surface beauty is rooted in solid foundation work.
Another lesson: never underestimate the power of the right tools combined with routine care. Investing in a quality laser level and maintaining it ensures consistent results, saving time and costly rework. This ongoing attention prevents minor issues from snowballing into major repairs, a principle I now swear by.
Lastly, patience and education are your best allies. Rushing through sealing or not understanding moisture management can jeopardize your entire project. Taking the time to learn from trusted sources—like the in-depth guides and tips available on our site—can elevate your craftsmanship from amateur to professional.
Tools and Resources That Elevated My Floors
My essential toolkit includes a laser level for pinpoint accuracy, a high-quality grout sealer, and a reliable self-leveling compound. These tools have directly contributed to seamless, durable results. I also frequently consult the comprehensive articles from trusted sources like Tile Trend Shop, which provide insights that go beyond basic tutorials.
For flooring ideas and color schemes, I turn to industry-leading publications and expert blogs that reveal current trends and timeless techniques. Having a curated set of resources helps me troubleshoot challenges effectively and stay inspired on new projects.
Your Next Step in Flooring Confidence
There’s a world of opportunity waiting when you commit to mastering your tile and hardwood flooring projects. Remember, every crack repaired, every subfloor leveled, and every sealant applied properly enhances the longevity and beauty of your floors. So, gather your tools, educate yourself continuously, and embrace the process with patience and pride. Your dream of flawless floors is within reach—start today, and don’t be afraid to make those improvements that will pay off for years to come.
What’s the biggest flooring challenge you’ve faced that you’re ready to conquer? Share your story below and let’s find solutions together!
,