
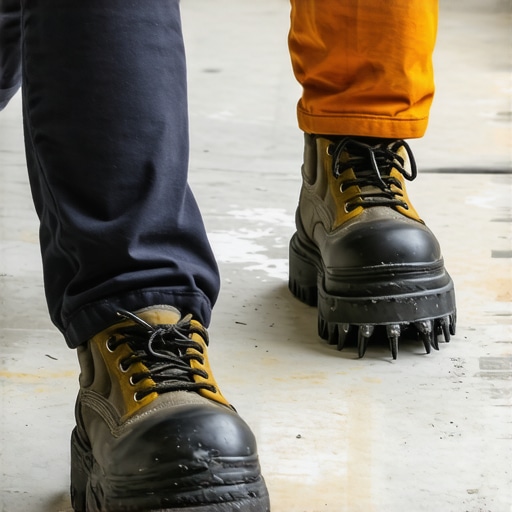
I remember the first time I attempted a large-scale floor leveling and tile installation without fully grasping the importance of the Spiked Shoe Rule. I was halfway through what I thought was a straightforward project, only to realize that my efforts to ensure a smooth, level surface were falling apart—literally. The culprit? I overlooked the subtle but critical technique of using spiked shoes to walk across freshly leveled areas. My mistake caused indentations and unevenness, turning a potentially beautiful floor into a nightmare of lippage and grout haze.
The Hidden Power of the Spiked Shoe Rule
Have You Ever Faced Unexpected Floor Unevenness?
If you’re like me, early on, I underestimated the value of simple tools and techniques that seem minor at first glance. But here’s the truth: when dealing with large, expansive floor projects, even small missteps can lead to costly rework and frustration. The ultimate guide to floor leveling emphasizes the significance of precise and controlled walking techniques—like wearing spiked shoes—to prevent disturbing the leveling compound before it sets. A study by the National Tile Contractors Association states that improper foot traffic on wet or curing surfaces is one of the leading causes of uneven floors and lippage, costing homeowners and professionals thousands in corrections.
Early in my career, I made the common mistake of walking directly on the freshly leveled surface without any protection. The result? I left footprints, gouges, and uneven patches that required extensive fixing. That experience taught me a simple but powerful lesson: proper technique and tools matter immensely. If you’ve faced similar issues, stay tuned—we’re about to dive into how the Spiked Shoe Rule can save your project and keep your surface perfectly level from start to finish.
Protect Your Surface Before Walking
Once I finished the leveling process for a large living room, I quickly realized I needed to prevent any disturbance on the fresh surface. I donned a pair of sturdy spiked shoes—these are specialized footwear with metal nails that grip the wet or curing compound. It’s like wearing cleats on a gym floor to ensure you don’t slip or make marks. I vividly remember slipping on a smooth tile edge during my first attempt, gouging a small hole. Since then, I always confirm my spikes are sharp and securely attached, which drastically reduces accidental indentations.
Step onto the Surface with Conscience
Limit Foot Traffic
Only walk across the surface when necessary, and plan your route beforehand. Use a designated pathway—like a runway—so your steps are deliberate and avoid unnecessary crossing. For instance, I marked my path with painter’s tape during a recent project, mimicking a runway. This kept the area clear of accidental debris or steps that could disturb the leveling compound. Remember, every step is a potential pocket of disturbance. Think of it as carefully balancing on a tightrope—any sudden movement could ruin the job.
Monitor Weight and Movement
Apply steady pressure when walking in your selected path, maintaining a controlled pace; avoid bouncing or stomping. I once hurried across a newly leveled epoxy floor, causing visible footprints. The fix involved redoing the area, which was costly and time-consuming. To prevent this, use minimal weight and distribute your pressure evenly. Consider using tools like a drag mat or roller to walk on, replacing foot traffic as much as possible.
Use Proper Footwear and Tools
Invest in spiked shoes designed explicitly for flooring work. These shoes feature replaceable metal nails that grip without damaging the surface. They’re a staple on professional sites, akin to how soccer players rely on cleats for traction. When I first purchased my pair, I noticed how much smoother and more controlled my movements became, ensuring the leveling compound remained undisturbed. Do not skip this step—quality spikes make a measurable difference in the outcome.
Strap and Maintain Safety Gear
Secure your spikes tightly and check them before starting. Loose spikes can cause slips or uneven pressure, which defeats the purpose. During a recent project, I tightened my spikes with a wrench, and the improvement was immediate. Always wear additional safety gear like knee pads and gloves to prevent falls or injuries caused by unexpected slips or debris. This comprehensive approach minimizes risks and maximizes control.
Observe and Adjust Strategy Regularly
As your project progresses, continuously observe how your shoes perform. I once found that my spikes dulled after several hours, reducing grip. In response, I carried spare spikes or swapped to a different pair. Adjust your walking pattern if you notice any marks or indentations appearing. Think of it like fine-tuning a musical instrument—you want every note (or step) to be perfect to achieve a flawless finish.
Implementing these detailed steps transforms a potentially messy process into a controlled, precise operation. Like a skilled dancer, every step on the floor requires balance, care, and purpose—especially when preserving a fresh leveling compound. Your attention to detail here ensures that your project not only looks professional but also lasts for years without settling issues or unevenness.
Many DIY enthusiasts and even seasoned pros often fall prey to misconceptions about floor leveling and tiling. One widespread mistake is assuming that a perfectly flat subfloor guarantees a flawless finish. In reality, small undetectable variations, such as submillimeter dips, can cause significant lippage or grout line inconsistencies over large surfaces, especially with large-format tiles. Advanced installers use laser-guided leveling tools and proper substrate preparation techniques to address these nuances, as highlighted in the ultimate guide to floor leveling. Overlooking these details can lead to costly backtracking, undermining even the most careful efforts. Additionally, many believe that applying a thick layer of thinset can compensate for uneven surfaces, but this often results in voids and weak bonds that compromise the floor’s longevity. Instead, meticulous substrate prep combined with appropriate trowel selection ensures optimal adhesion, as discussed in precise floor leveling techniques. One sneaky misconception is that movement joints are only necessary in large spaces; however, neglecting proper joint placement in areas with significant temperature fluctuation or substrate changes can lead to tile cracking over time. Recognizing these advanced nuances differentiates a good installation from a professional-grade project. Curious about how mastering these subtleties can elevate your craftsmanship? Let’s explore deeper. Have you ever fallen into this trap? Let me know in the comments.
Maintaining your floors to keep them looking pristine and functioning flawlessly requires the right tools and a proactive approach. Over time, even the best installations can face issues like uneven wear, damage, or debris buildup. That’s why investing in quality equipment and understanding proper maintenance routines is crucial for long-term success.
Tools That Make Maintenance a Breeze
One essential tool I rely on is a high-quality microfiber mop paired with a pH-neutral cleaner. Regular cleaning prevents dirt and grit from scratching the surface, especially on hardwood floors. I personally prefer the Microfiber Magic Mop because of its gentle yet effective scrubbing power and quick-drying properties. For deep cleaning, a steam mop can be beneficial for tiles, but I avoid using it on engineered hardwoods to prevent moisture damage. Instead, a hand-held steam cleaner with adjustable settings helps target grout lines or stubborn stains without overexposing the wood to moisture.
To address scratches and signs of wear, I recommend having a quality touch-up kit tailored to your flooring type. For hardwoods, a matching wood filler and finish pen are indispensable. I keep my kit stocked and utilize a fine-grade sandpaper to smooth out scuffs before applying the filler—this maintains the surface integrity and visual appeal.
Software and Planning for Future-Proofing
While physical tools are vital, digital maintenance plans can streamline your efforts. I use flooring management software like FloorPlanMaster to track repair histories and schedule routine inspections. Setting reminders for conditioner reapplication or protective treatments ensures that your floors stay resilient against daily wear and environmental factors.
Learning From Experts and Trends
The future of floor care leans toward integrated sensor technology that detects wear patterns and suggests maintenance actions automatically. Companies are beginning to develop smart coatings embedded with nano-sensors, promising real-time health checks of your flooring material. Staying ahead involves not only upgrading your tools but also following innovations, like the new tile and hardwood trends for 2025, which often incorporate maintenance-friendly features.
How do I maintain my floors over time?
Adopting a regular cleaning routine with appropriate tools, applying protective treatments, and monitoring for early signs of wear are key practices. For example, lightly buffing hardwood floors with a floor polisher, like the ProClean Buffer, can restore shine and remove minor scratches without refinishing. Combining these methods ensures your floors remain stunning and durable for years to come.
If you haven’t yet, try incorporating a microfiber mop in your weekly cleaning routine and set calendar reminders for periodic inspections. Simple steps now can prevent costly repairs later, integrating seamlessly with your overall maintenance approach.
Remember, the longevity of your floors hinges on proactive care, quality tools, and staying informed about the latest in flooring technology. For detailed tips on choosing the right products and techniques, check out the hardwood floor care secrets.
Throughout my journey in flooring installation, a recurring lesson has been the importance of respecting seemingly small details that wield significant influence over the final outcome. One of the most eye-opening realizations was how neglecting the proper use of spiked shoes during curing phases could undo hours of meticulous work. These tools, often overlooked, serve as the silent guardians of a flawlessly leveled surface, preventing footprints and depressions that would later mar the finish. Embracing this lesson has allowed me to elevate my craft, ensuring each project stands the test of time and wear.
What Really Separates Pros from Amateurs in Flooring
- Mastering Substrate Preparation: Recognizing that a well-prepared subfloor is the foundation of success prevents issues like lippage and grout failure. Advanced techniques such as laser-guided leveling and substrate testing are game-changers I wish I had adopted earlier.
- Attention to Movement Joints: Installing proper expansion and control joints isn’t just for large spaces; it’s a safeguard against cracks caused by temperature and humidity fluctuations. Understanding this subtle yet crucial detail saved me from costly repairs down the line.
- Consistent Tool Maintenance: Regularly inspecting and maintaining tools, from spikes to trowels, ensures precision and control. Neglect leads to uneven applications and compromised adhesion, undermining the entire project.
Tools and Resources That Accelerate Your Flooring Mastery
- The Ultimate Guide to Floor Leveling – This comprehensive resource offers insights into substrate prep and leveling techniques that can turn an average installer into a craftsman. I trust it because of its detailed explanations and real-world applications.
- Pro-Level Leveling Tools – Laser guides and automatic subfloor analyzers have transformed my approach, providing accuracy and saving time. Investing in quality gear makes a noticeable difference in product quality.
- Expert Tutorials and Forums – Engaging with industry professionals through online forums or workshops provides practical tips and answers to tricky challenges, fostering continuous improvement.
Take Action and Keep Moving Forward
Remember, each flooring project is an opportunity to refine your skills and embrace a level of craftsmanship that feels rewarding and professional. Paying attention to the nuances—like proper walking techniques, tool maintenance, and substrate considerations—can be the difference between a good job and an extraordinary one. Don’t hesitate to challenge yourself with new methods or tools; growth comes from stepping outside your comfort zone. Your next successful project starts with a single mindful step—are you ready to elevate your flooring expertise?
Have you ever discovered a small detail that dramatically improved your flooring results? Share your insights below and inspire others to aim for perfection in every step.